In the previous tutorial, we learned the basics of Alpine.js using a very simple counter example, but as you know in reality applications are more complex, so in this tutorial we will explore how to handle models and forms effectively using Alpine.js. The reason I’m using a web form as an example is that forms are a common part of web applications. and also I feel like Alpine works really well with forms in terms of tracking user input and providing interactivity features.
To get started, remove all the code inside the <body> tag from the previous tutorial and remove counter data object in index.js file. Then, I’ll add a simple form inside the <body> tag as shown below:
<form>

    <h1>Codestandup Signup Form</h1>

    <div class="form-field">
      <label>
        <span>Username:</span>
        <input type="text" maxlength="15" />
      </label>
    </div>

    <div class="form-field password">
      <label>
        <span>Password:</span>
        <input type="password" />
      </label>
    </div>

    <div class="form-field confirm-password">
      <label>
        <span>Confirm Password:</span>
        <input type="password" />
      </label>

      <div class="form-field">
        <label>Belt Color:
          <select>
            <option value="">Select a belt color</option>
            <option value="yellow">Yellow</option>
            <option value="orange">Orange</option>
            <option value="green">Green</option>
            <option value="blue">Blue</option>
            <option value="brown">Brown</option>
            <option value="black">Black</option>
          </select>
        </label>
      </div>

      <div class="form-field">
        <label>
          <span>Short Bio:</span>
          <textarea maxlength="100"></textarea>
        </label>
      </div>

      <div class="form-field newsletter">
        <label>
          <input type="checkbox" />
          <span>Sign me up for the Codestandup newsletter!</span>
        </label>
      </div>

      <button type="submit">Sign Up</button>

  </form>
Above is a pretty standard signup form with some common fields. We are gonna use Alpine.js to help us implement functionality and interactivity into this form. First we need to add an x-data directive to the <form> tag to initialize an Alpine.js component. We are gonna leave it empty like x-data="" for now because we will be adding data properties in the external index.js file and then we’ll reference it here.
Data Binding with x-model
#
One of the most powerful features of Alpine.js is its ability to bind data to form elements using the x-model directive. This allows us to create two-way data bindings between our JavaScript data and the form inputs. Let’s start by adding x-model directives to each of the form fields to bind them to corresponding data properties.
<form x-data="signupForm">

    <h1>Codestandup Signup Form</h1>

    <div class="form-field">
      <label>
        <span>Username:</span>
        <input type="text" maxlength="15" x-model="username" />
      </label>
    </div>

    <div class="form-field password">
      <label>
        <span>Password:</span>
        <input type="password" x-model="password" />
      </label>
    </div>

    <div class="form-field confirm-password">
      <label>
        <span>Confirm Password:</span>
        <input type="password" x-model="confirmPassword" />
      </label>
    </div>

      <div class="form-field">
        <label>Belt Color:
          <select x-model="beltColor">
            <option value="">Select a belt color</option>
            <option value="yellow">Yellow</option>
            <option value="orange">Orange</option>
            <option value="green">Green</option>
            <option value="blue">Blue</option>
            <option value="brown">Brown</option>
            <option value="black">Black</option>
          </select>
        </label>
      </div>

      <div class="form-field">
        <label>
          <span>Short Bio:</span>
          <textarea maxlength="100" x-model="bio"></textarea>
        </label>
      </div>

      <div class="form-field newsletter">
        <label>
          <input type="checkbox" x-model="newsletter" />
          <span>Sign me up for the Codestandup newsletter!</span>
        </label>
      </div>

      <button type="submit">Sign Up</button>
  </form>
Now, we need to define the signupForm data object in our index.js file. Let’s add the following code:
document.addEventListener('alpine:init', () => {
  Alpine.data('signupForm', () => ({
    username: '',
    password: '',
    confirmPassword: '',
    beltColor: '',
    bio: '',
    newsletter: true,
  }));
});
With this setup, each form field is now bound to a corresponding property in the signupForm data object. For example, the username input field in the form is bound to the username property in the data object. This means that whenever the user types into the username field, the username propert y will automatically update to reflect the current value of the input. In the checkbox for the newsletter, the newsletter property will be a boolean that reflects whether the checkbox is checked or not. In the select dropdown for belt color, the beltColor property will hold the value of the selected option.
If you want to see this in action, you can use the x-text directive to display the current values of the data properties below inputs.
<div class="form-field">
  <label>
    <span>Username:</span>
    <input type="text" maxlength="15" x-model="username" />
  </label>
  <div>Your username is: <span x-text="username"></span></div>
</div>
This will show the current value of the username property as the user types into the input field.
Attribute Binding #
Let’s talk about attribute binding which is something we can do to bind dynamic values to HTML attributes. As an example, we can conditionally style elements. In this project, we will use attribute binding to make the character count of the username input change color based on how many characters have been typed. We are going to achieve this by binding to the class attribute and make the text red when a certain condition is true.
Let’s add a character count display below the username input field:
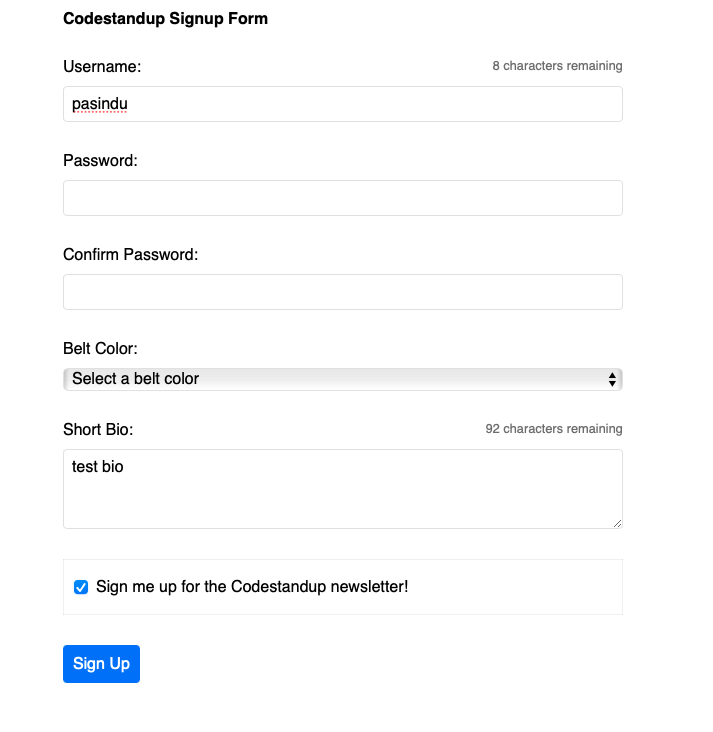
<div class="form-field">
  <p class="hint">
      <span x-text="15 - username.length"></span> characters remaining
  </p>
  <label>
      <span>Username:</span>
      <input type="text" maxlength="15" x-model="username" />
  </label>
</div>

      <!-- I added the same condition for bio -->

<div class="form-field">
    <p class="hint">
    <span x-text="100 - bio.length"></span> characters remaining
    </p>
    <label>
      <span>Short Bio:</span>
      <textarea maxlength="100" x-model="bio"></textarea>
    </label>
</div>
If you run the HTML now, you will see the character counts updating as you type.
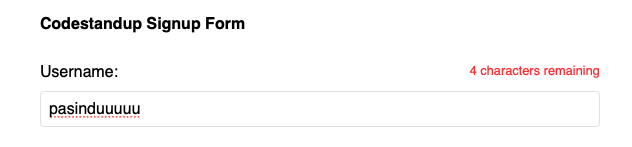
Now I want to make the character count text turn red when the user has 5 or fewer characters remaining for the username and 20 or fewer characters remaining for the bio. We can do this by binding to the class attribute of the <p> tag using the x-bind:class directive. But remember that attribute binding is not limited to just the class attribute, you can bind pretty much any normal HTML attribute.
<!-- Username Field -->
<p class="hint"
    x-bind:class="{ 'warning': username.length >= 10 }">
    <span x-text="15 - username.length"></span> characters remaining
</p>

<!-- Bio Field -->
<p class="hint"
    x-bind:class="{ 'warning': bio.length >= 80 }">
    <span x-text="100 - bio.length"></span> characters remaining
</p>
With this code, the warning class will be added to the <p> tag when the username has 10 or more characters (5 or fewer remaining) and when the bio has 80 or more characters (20 or fewer remaining).
Remember that we can use shorthand syntax for x-bind by using just a colon : before the attribute name. So we could also write like :class instead of x-bind:class.
Events and Modifiers #
Let’s talk about event and event modifiers. We already used x-on directive to attach a click event onto a button and in reaction we can run some code. Now we can talk about other events and how to attach event modifiers to those events to kind of modify how they work. Let’s add three buttons and an input field under the <h1> tag.
<h1>Codestandup Signup Form</h1>

<button type="button">Click</button>
<button type="button">Mouse Leave</button>
<button type="button">Double Click</button>
<input type="text"/>
Make sure that if you are attaching an event to something using Alpine.js, that element has to be inside an element with x-data directive. Currently, our <form> tag has the x-data directive, so we are good. Now let’s attach some events to these buttons and input field using x-on directive.
<h1>Codestandup Signup Form</h1>

<button type="button" x-on:click="console.log('Button Clicked!')">Click</button>
<button type="button" x-on:mouseleave="console.log('Mouse Left!')">Mouse Leave</button>
<button type="button" x-on:dblclick="console.log('Button Double Clicked!')">Double Click</button>
<input type="text" @keyup="console.log('Key Up!')" />
Instead of writing x-on:, we can use the shorthand syntax @ to attach events.
These are some of the events that we can attach to elements using Alpine.js. There are many more events available that you can use based on your requirements. You can refer to the Alpine.js documentation for a complete list of events.
One of those elements is x-on:submit event that we can attach to the <form> tag to handle form submissions. Default behavior of a form submission is to reload the page, but we can prevent that using the .prevent event modifier. Let’s add a submit event to the form like so:
<form x-data="signupForm" x-on:submit.prevent="handleSubmit">Now, we need to define the handleSubmit method in our signupForm component inside the index.js file. Let’s update the index.js file like so:
document.addEventListener('alpine:init', () => {
  Alpine.data('signupForm', () => ({
    username: '',
    password: '',
    confirmPassword: '',
    beltColor: '',
    bio: '',
    newsletter: true,

    handleSubmit() {
      console.log('Form Submitted!');
      console.log('Username:', this.username);
      console.log('Password:', this.password);
      console.log('Confirm Password:', this.confirmPassword);
      console.log('Belt Color:', this.beltColor);
      console.log('Bio:', this.bio);
      console.log('Newsletter:', this.newsletter);
    },
  }));
});
With this setup, when the user submits the form, the handleSubmit method will be called, and it will log the form data to the console without reloading the page.