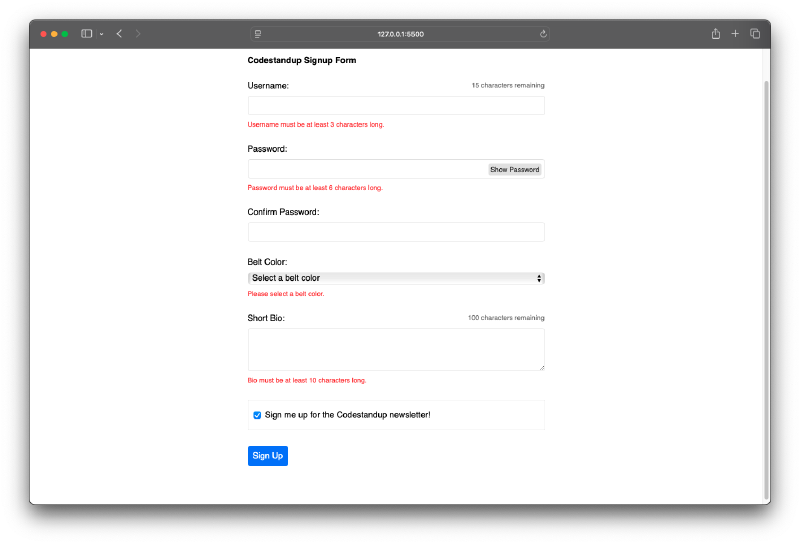
Show/Hide Password Field #
In this tutorial, we will use combination of the different techniques we have learned over the previous couple of lessons to make the password field show and hide the password when the user clicks a button. We will be using a combination of click events and some attribute binding to do this.
The way we will do this is by toggeling the type of the input field between password and text, because when the type is password the characters are hidden, and when the type is text the characters are shown. This means the value of the type attribute needs to be dynamic and not static, which means we need to do some attribute binding with x-bind(:) on the type attribute.
<div class="form-field password">
      <label>
        <span>Password:</span>
        <input :type="password" x-model="password" />
      </label>
    </div>
Now as a we need to return either password or text as the input type. Then in the index.js file we can create a property in the data object in the index.js called passwordVisible and set it to false by default. Now when the value is false we want to return password as the type, and when it is true we want to return text as the type.
document.addEventListener('alpine:init', () => {
  Alpine.data('signupForm', () => ({
    // Other properties...

    passwordVisible: false,

    handleSubmit() {
        // example submit handler
    },
  }));
});
Then we can use a ternary operator in the x-bind:type to return either password or text based on the value of passwordVisible.
<input :type="passwordVisible ? 'text' : 'password'" x-model="password" />Then we need a button that the user can click to toggle the value of passwordVisible between true and false. Currently it always set to false, which means the password will always be hidden. We can add a button next to the input field that the user can click to toggle the value.
<div class="form-field password">
      <label>
        <span>Password:</span>
        <input :type="passwordVisible ? 'text' : 'password'" x-model="password" />
      </label>

      <button type="button" @click="passwordVisible = !passwordVisible">
        <span x-text="passwordVisible ? 'Hide' : 'Show'"></span> Password
      </button>

    </div>
In above code, we added a button with a click event listener that toggles the value of passwordVisible between true and false whenever the button is clicked. We also used x-text to change the button text based on the value of passwordVisible.
Form Reset and Validation #
In this section, we’ll handle what happens when the user submits the form. First, we will take those input values and make sure they pass some basic validation rules. if they don’t pass the validation rules we will generate validation messages to each input field and store them in a property in our data object, later on we can show those messages in the form itself. If the validation passes we will reset the form to its initial state. We might also log some success message to the console.
Let’s start with the validation rules. Let’s move to the data object and make a new function called validateForm. Inside this function we are going to validate each individual field and we will create an errors object to store any validation messages.
    // Validation errors object
    errors: {},

    // Form validation method
    validateForm() {
      this.errors = {};

      if (this.username.length < 3) {
        this.errors.username = "Username must be at least 3 characters long.";
      }
      if (this.password.length < 6) {
        this.errors.password = "Password must be at least 6 characters long.";
      }
      if (this.password !== this.confirmPassword) {
        this.errors.confirmPassword = "Passwords do not match.";
      }
      if (!this.beltColor) {
        this.errors.beltColor = "Please select a belt color.";
      }
      if (this.bio.length < 10) {
        this.errors.bio = "Bio must be at least 10 characters long.";
      }
    },
I hope you can understand what is happening in the above code. We are checking each field against some basic rules and if they don’t pass we are adding a message to the errors object with the field name as the key. Then we can modify the handleSubmit method to call this validateForm method and check if there are any errors. If you open the browser console and try to submit the form with invalid data you should see the validation messages in the console.
The next step is conditional resetting the form if there are no validation errors. We can do this by checking if the errors object is empty after calling validateForm. We can modify the handleSubmit method like this:
    handleSubmit($event) {

      this.validateForm();
      console.log(this.errors);

      if (Object.keys(this.errors).length === 0) {

        console.log(this.username, this.password, this.beltColor, this.bio, this.newsletter);

        $event.target.reset();

      }

    },
In the above code, handleSubmit receives the submit event object as a parameter. After validating the form, we check if the errors object is empty by checking the length of its keys. If there are no errors, we log the form data to the console and reset the form using $event.target.reset(), which resets all input fields to their initial state.
x-if #
So far we show validation after submitting the form and logging the errors to the console. Now let’s show those validation messages in the form itself, right below each input field if we have any. To do that we need to conditionally render those error messages based on whether there is an error for that field in the errors object. When we use Alpine.js we can do this easily with the x-if directive. But there is a small catch, we can’t use x-if on any regular HTML element, we need to use it on a <template> element. Let’s demo this and then I will explain why.
<template x-if="errors.username">
        <p class="error" x-text="errors.username"></p>
</template>
In the above code, we are using x-if on a <template> element to conditionally render a <p> with the error message for the username field. if there is an error message for the username field in the errors object, then the condition will be true and the <p> will be injected into the DOM. If there is no error message, then the condition will be false and nothing will be rendered. This is important because if we used x-show instead, the <p> would always be in the DOM, but just hidden with CSS. This means that screen readers and other assistive technologies would still read out the error message even when it is not visible to the user. By using x-if, Alpine.js actively adds and removes the element from the DOM, which is better for accessibility.