The vibe coding scene is evolving rapidly, and developers are constantly seeking tools that can streamline their workflow and enhance productivity. GitHub recently introduced the Spec Kit. It’s a tool kit designed to facilitate spec-driven development, allowing developers to write specifications that directly influence their AI assistants’ behavior and code generation.
In Spec-Driven Development, when we are developing we start with a high-level specification of what we want to achieve. We describe what it should be, what it should do without getting into any technical details. From that specc, everything else can be generated or derived, a detailed technical plan on how it can be built and with what tools. Then a list of actionable tasks that can be executed to fullfill the plan. And finally the actual code that implements the tasks. And heart of it all is the original high level spec.
Spec Kit provides a bunch of pre defined prompts and scripts to help you follow this kind of workflow with the final goal being that coding agents like GitHub Copilot, Claude Code, Codex or whatever else can produce better results. This is something you can implement into your workflow from day one on a brand new project or you can also use it to refactor and improve existing codebases.
Personally I’ve never been a big fan of vibe coding. I think when you just let the AI go wild, it’s way too easy for it to go off track, throw in random buggy code and everything end up feeling just carelessly thrown together. When you have a solid spec to follow, you will feel like you are much more in control of the process. You can see exactly the coding agent is planning and doing, and there is less chance of it going off the track. Let’s get started with the setup.
Setting up GitHub Spec Kit #
The easiest way to get started with GitHub Spec Kit is to go to the GitHub repository and follow the instructions in the README file. I’ll use the option 2 which is to the uvx command line tool to run the Spec Kit scripts.
First, make sure you have uvx installed. uv is a high-performance Python package and project manager with modern features. What uvx does is running a package without installing it globally on your system. It’s similar to npx for Node.js.
Once you have uvx installed, you can run below command to spin up a new Spec Kit project:
uvx --from git+https://github.com/github/spec-kit.git specify init <PROJECT_NAME>You can also add some flags to customize the project setup. In our case we will use -here to create the project in the current directory.
In my case I have prepared an bare bone Next.js project in advance so I will run the command inside that folder:
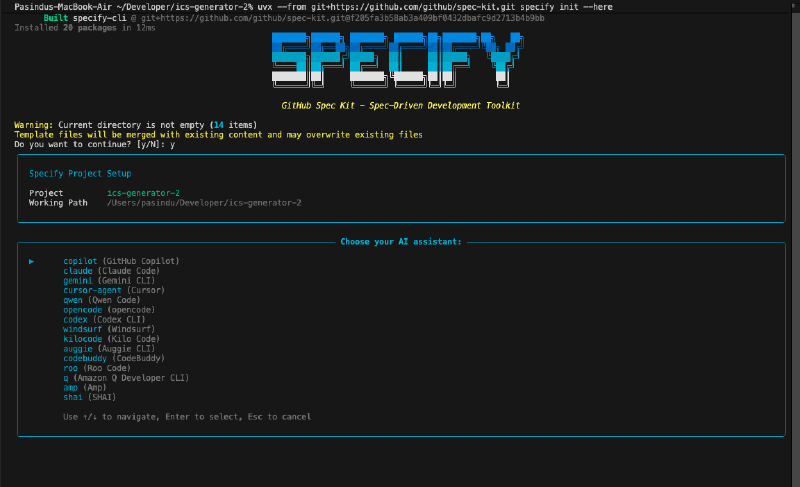
uvx --from git+https://github.com/github/spec-kit.git specify init --hereThis will run Spec Kit CLI and first tell you that the current directory is not empty. It will then ask you if you want to proceed anyway. Type y and hit enter to continue.
Next it will ask you to choose an AI assistant. I will choose GitHub Copilot for this tutorial. You can also choose other assistants like Claude Code or Codex if you prefer.
After that, it will ask you to select the script for your OS. I am using macOS, so I will choose the sh option. If you are using Windows, you can choose the ps option.
When we confirm the options, Spec Kit is going to look at our selected options and pull down the necessary files and folders from GitHub Spec Kit repository and put them into our project root. If you choose copilot as your AI agent, you should see a folder called .github with some ready made Copilot prompts inside.
Exploring the Spec Kit Setup #
Prompts #
Inside .github directory, you will find a prompts folder which contains all the prompt prepared, currently these files are mostly empty. When we make prompts files like this inside .github/prompts/ folder, the Copilot workflows will automatically pick them up and make them available when we run the Copilot chat commands. As an example if you type /plan in Copilot chat, you will get a suggestion to use /speckit.plan prompt. All these prompts represent different stages of development cycle that we will be going through with spec kit.
Specify #
We got another new folder called specify in the root. It contains three more sub folders: memory, scripts and templates. Memory folder has constitution.md file which lays out the high level principles and guidelines for the AI assistant to follow throughout the development process. Scripts folder contains various scripts that we can run to automate different parts of the development workflow. The .github/prompts/ files instruct the AI agent to use these scripts to do things like create new feature branches, create new spec files, run tests, and so on. You don’t need to change these scripts, unless you want to customize how spec kit runs and works. Finally, the templates folder contains a bunch of template files for the coding agent to use when generating specs, plans, tasks, and code. We’ll talk about these files more in the upcoming tutorials and use different commands to make new features.
Development Workflow with Spec Kit #
Constitution #
Before we start using Spec Kit, let’s quickly go through the overall development cycle that we will be following in this tutorial series. We are going to start by using the /speckit.constitution command to outline some core binding principles for the applications as a whole. That command then runs the constitution prompt which instructs the coding agent to create a constitution file with those principles. As an example, If the application must focus on accessibility in UX, then we would add that to the constitution.
Specify #
Next, we will use the /speckit.specify command to make a new high level specification for a new feature or functionality. For example, implementing a dashboard page that displays user statistics. This command would run the specify prompt and that prompt then instructs the coding agent to take our feature idea and turn it into a detailed spec. It also switches to a new git branch for that feature.
Plan #
We use /speckit.plan to run the plan prompt along with any technical preferences we have for the feature. We might want to Tailwind CSS or a certain charting library. So the plan prompt instructs the coding agent to take those technical preferences and implement a plan to build the feature according to the spec.
Tasks #
Then we use /speckit.tasks command, which runs the tasks prompt. That prompt tells coding agent to take the entire technical plan and turn it into a list of actionable tasks that can be executed step by step.
Implement #
Finally, we use /speckit.implement command to run the implement prompt. This prompt instructs the coding agent to take each task from the list and generate the actual code that implements it. This is where the coding agent really starts writing code based on the spec, plan, and tasks we’ve defined. So by the end of this cycle, we should have a new working feature all based on that initial spec. For any future features, we would just repeat this entire cycle again except for the constitution step.
Clarify and Analyze #
On top of these main commands, we also have some additional commands like /speckit.clarify and /speckit.analyze. The clarify command typically runs after the specify step if we need to refine or clarify any parts of the spec. The analyze command can be used after implementation to review the code and ensure it meets quality standards and adheres to the original spec.
Spec Kit or no Spec Kit, make sure to always double check and test the code and documentation generated by any AI coding assistant. They can be super helpful, but they are not perfect and can make mistakes. Always review the output to ensure it meets your standards and requirements. In the next tutorial, we will start using Spec Kit to create the constitution for our project. See you there!